The purpose of this guide is to give direction on how to setup and configure MythTV to use XMLTVListings.com guide data for the EPG. This guide already assumes that you have a functioning install of MythTV (both frontend and backend) This guide also assumes that you have a tuner card installed and setup correctly and have done a channel scan.
This user-contributed guide is offered "as is". Any issues or problems with using the guide, or MythTV are not covered in this guide. As such, no warranty, or support is offered to you regarding your MythTV system. Use at own risk.
Testing Parameters and Versions
- Ubuntu 20.10 was used for this test.
- Version 31 of MythTV was used and installed using "apt-get" https://www.mythtv.org/wiki/Installing_MythTV_on_Ubuntu
- System specs: Intel Core i3-2100 @ 3.1Ghz; 4GB RAM, 80GB SATA Hard Drive.
- Text
highlighted in this guide indicates what you should type at the terminal.
Gathering Information
- Log into your XMLTVListings.com account
- Note your API Key located at the top left under the "Account Summary". You will need the API Key later when you configure the grabber.
- Create a Lineup. When finished note the Lineup ID. This will be a 4 digit number.
- From the Dashboard, click the "Download" link so that you have a copy of the data file for reference. You will likely require the "channel- id" values in the data file for each channel. Typical file name will be "xmltv-0000.xml" (where 0000 is your Lineup ID).
- The reason you will require this copy is because when using the XMLTV package, mythfilldatabase internally invokes the XMLTV grabber you have selected, downloads that data into a temporary file, then reads that data and processes it into the database. https://www.mythtv.org/wiki/Mythfilldatabase
Installing XMLTV Package
- Setup the Video Source Name. Run the MythTV Backend Setup. Go to Video Sources (option 4) and create a new Video Source. Name the source (ie: OTA1). You may already have a named Video Source. Note this named Video Source.
- Change the listings grabber setting to: No grabber.
- If you are using OTA Broadcast channels, it is recommend to uncheck EIT as you should only use one source of data for a channel https://www.mythtv.org/wiki/EIT.
- Install the XMLTV package on your master backend server, using your distribution’s package manager [source: https://www.mythtv.org/wiki/XMLTV ]
- Note: you may want to terminate Mythfrontend if you are using the same system for both the backend and frontend. Hitting "ESC" on the keyboard will eventually bring you to an exit confirmation. Select "Yes, Exit Now."
- Optional: if you can’t exit the frontend, bring up a terminal and type:
$killall mythfrontend
$killall mythfrontend.real
You may need to do this multiple times in a row and very quickly.
- You should also stop the mythtvbackend as well. Type:
$sudo systemctl stop mythtv-backend.service
- Install XMLTV package using the following commands:
- Type: $
sudo apt update
- Type: $
sudo apt install git make xmltv perl-doc
- # Note: xmltv gets the required perl modules
- $
mkdir -p build
- $
cd build
- $
git clone https://github.com/XMLTV/xmltv.git
- $
cd xmltv
- $
perl Makefile.PL
- Type "yes" to proceed with configuration.
- $
make
- $
make test
- $
sudo make install
Configure the XMLTV Grabber
- Open the MythTV-Setup. $
mythtv-setup
- Go to Video Sources (option 4).
- Go to the "Listings grabber" and hit enter. Scroll through the list until you see: "North America (XMLTVListin…)":
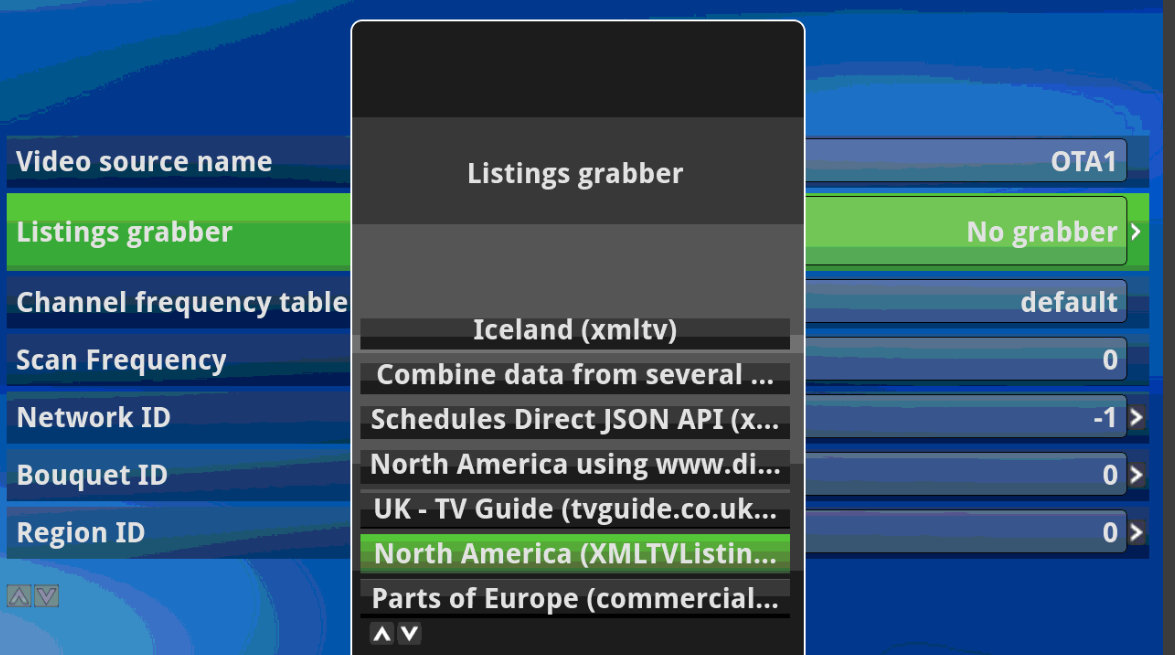
- Save your changes by "ESC" out.
Configure the Grabber
- From the terminal, you will now need to configure "tv_grab_na_tvmedia". [source: http://wiki.xmltv.org/index.php/HowtoUseGrabbers]
- Type:
$tv_grab_na_tvmedia --configure --config-file $HOME/.mythtv/YYYY.xmltv
- The value YYYY in the configuration file name corresponds to the Video Source Name. If your video source name includes spaces, put quotes around it. This value was noted in step 1 in the section Installing XMLTV Package of this guide.
- Enter your API key which is found on your account dashboard page. This was noted earlier in the section Gathering Information of this guide.
- Choose one or your lineups. You can add or modify lineups from your account page. This was noted earlier in the section Gathering Information of this guide.
- If the mythtv-backend was running, you will now need to restart it. If it wasn’t running, run the mythtv-backend so that the tv_grab_na_tvmedia grabber can run. (" sudo systemctl start mythtv-backend.service")
Edit Your Channels
- Now you will need to edit each channel so that MythTV knows which guide information to pull for the channel.
- Stop the mythtv-backend service and open MythTV-Setup
$sudo systemctl stop mythtv-backend.service
$mythtv-setup
- Select Option 6 -- Channel Editor
- Add New Channel -> Channel Options - Common
- Enter Channel Name (ie: Global BC, or PBS)
- Enter the Channel Number (ie: 8-1). This should reference the channel where you would tune into to view the channel.
- Enter the Callsign (ie: CHAN)
- Make sure the Visible setting is set to "Always Visible". Otherwise, this channel won’t appear in the guide.
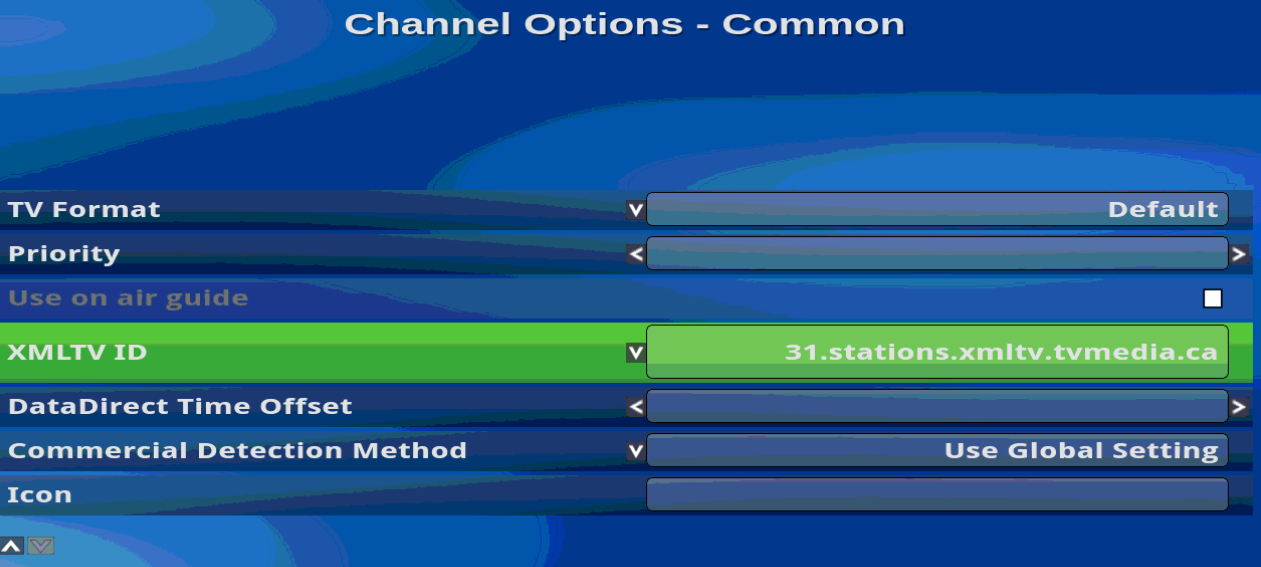
- Move down the list to "XMLTV ID".
- Here is where you will need to open the .xml file that you downloaded in step 4 of Gathering Information. You can open this file with a text editor.
- In the xml file, each channel is listed at the beginning of the file. Note the <channel-id= value and enter that into this field. For example:
<channel-id="31.stations.xmltv.tvmedia.ca">
You would type in 31.stations.xmltv.tvmedia.ca in the XMLTV ID value:
 You will need to do this for EACH channel so this could take some time depending on how many channels that you have.
- NOTE: enter the channels in the exact order that you wish to see them in the guide.
- Hit "ESC" and "Save then Exit". You will see your channel in the list.
- Optional: Press the Icon Download button at the bottom and scan for missing icons. This allows you to set the icon for each channel.
- Hit "ESC" out of the Channel Editor.
- Hit “ESC” out of the MythTV-Setup GUI screen.
- You will be prompted to run “mythfilldatabase” to populate the channel guide. Hit "OK"
- After exiting, a screen will popup asking if you would like to start mythtv backend service. Click on "YES".
- If you don’t see this screen, you can type this into the terminal:
$sudo systemctl start mythtv-backend.service
- You will then be prompted with a mythfilldatabase prompt. Say "YES":

- If you don’t see this screen, you can type this into the terminal:
$mythfilldatabase
This command will force a download of the guide data and populate the database. This could take some time depending on how many channels are in your lineup. It is advised to create a lineup with only the channels that you want.
- Note: you may need to run "mythfilldatabase" as the mythtv user. To do this type:
$sudo su mythtv
$mythfilldatabase
- Open the Frontend and go to the Program Guide. If all is setup correctly, your guide may appear similar to this:

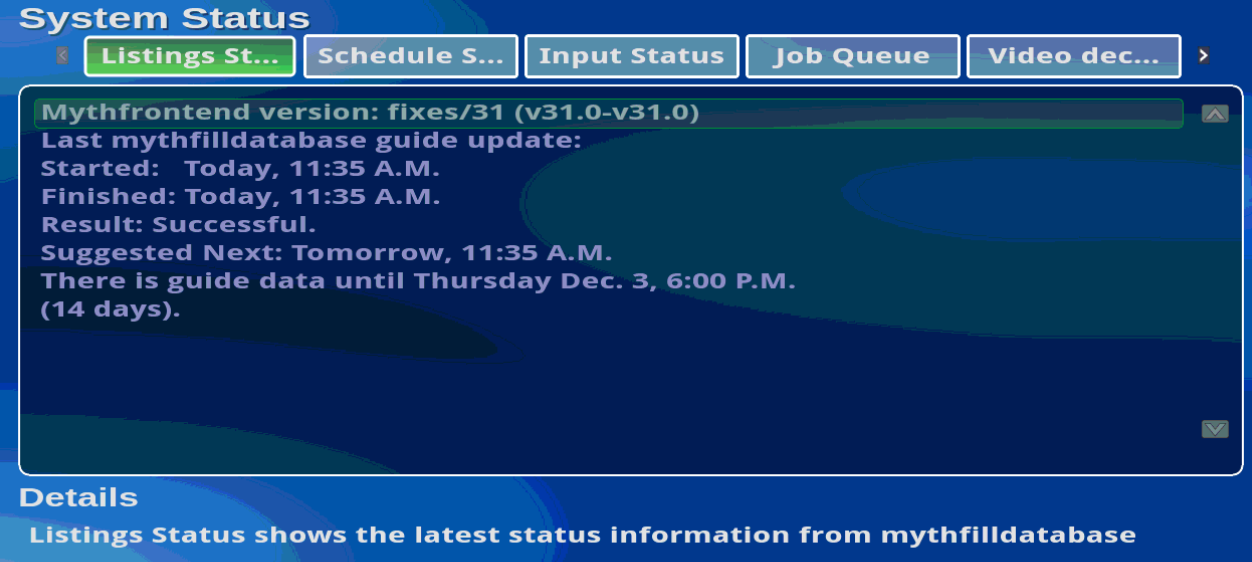
- You can verify your mythfilldatabase updates from the MythTV frontend as well.
- Go to Information Centre from the Main Menu.
- Select System Status: